Mastering std::list in Modern C++
std::list is a sequence container in the C++ Standard Template Library (STL) implemented as a doubly linked list.
Unlike contiguous containers such as std::vector, a list stores elements in separate memory nodes connected through pointers. This design provides efficient insertion and deletion operations while maintaining stable references and iterators.
Table of Contents
Open Table of Contents
- Understanding
std::list - Internal Architecture
- 1. Initialization
- 2. Inserting Elements
- 3. Accessing Elements
- 4. Updating Elements
- 5. Traversing a List
- 6. Finding Elements
- 7. Deleting Elements
- 8. Other Member Functions
- Time Complexity Analysis
- Iterator Validity & Memory Guarantees
- Best Practices
- Common Pitfalls
- Conclusion
Understanding std::list
A std::list is a doubly linked list where each element is stored in an independent memory node.
Each node contains:
- The actual data
- A pointer to the next node
- A pointer to the previous node
+------+     +------+     +------+
| 10   | --> | 20   | --> | 30   |
| prev | <-- | prev | <-- | prev |
+------+     +------+     +------+
Because nodes are dynamically allocated, they are scattered throughout memory rather than stored contiguously.
Internal Architecture
Node-Based Storage
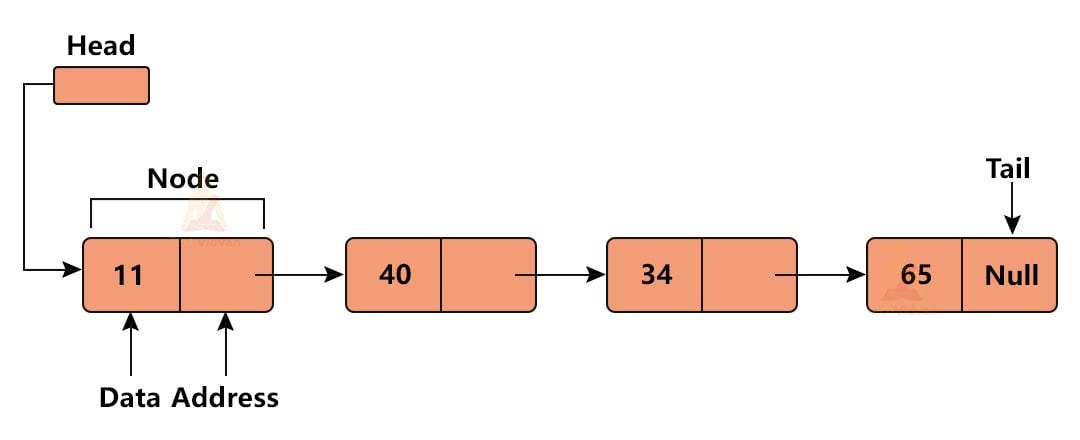
Every element resides inside an individual heap-allocated node.
Benefits
- Constant-time insertion and deletion
- Stable references and iterators
- No reallocation when growing
Drawbacks
- Higher memory overhead
- Poor cache locality
- No random access support
1. Initialization
To use std::list, include the <list> header.
#include <list>Memory Operations
Step 1: Allocate the internal sentinel/head node.
Step 2: Initialize the size tracker to 0.
Step 3: If values are provided, allocate nodes and connect them together.
Example
#include <iostream>
#include <list>

int main() {
    std::list<int> numbers;

    std::list<int> initializedList = {10, 20, 30};

    return 0;
}
2. Inserting Elements
Elements may be inserted at the beginning, end, or any arbitrary position.
Available Functions
push_front()
push_back()
insert()
emplace_front()
emplace_back()
emplace()
Memory Operations
Step 1: Dynamically allocate memory for a new node.
Step 2: Construct the value inside the node.
Step 3: Update the previous node’s next pointer.
Step 4: Update the next node’s prev pointer.
Step 5: Attach the new node into the chain.
Example
#include <iostream>
#include <list>

int main() {
    std::list<int> numbers = {10, 20};

    numbers.push_front(5);
    numbers.push_back(40);

    auto it = numbers.begin();
    std::advance(it, 2);

    numbers.insert(it, 15);

    for (int n : numbers)
        std::cout << n << " ";
}
Output:
5 10 15 20 403. Accessing Elements
Since list nodes are not contiguous, direct indexing is impossible.
The following are supported:
front()
back()
Memory Operations
Step 1: Locate the head node.
Step 2: Locate the tail node.
Step 3: Return a reference to the stored data.
Example
std::list<int> numbers = {5, 10, 15, 20};

std::cout << numbers.front();
std::cout << numbers.back();
Output:
5
20
4. Updating Elements
Elements can be modified through references or iterators.
Memory Operations
Step 1: Traverse to the desired node.
Step 2: Access its data field.
Step 3: Replace the stored value.
Step 4: Leave all pointers unchanged.
Example
std::list<int> numbers = {5, 10, 15, 20};

numbers.front() = 2;

auto it = numbers.begin();
std::advance(it, 2);

*it = 18;
Result:
2 10 18 205. Traversing a List
Traversal means visiting every node in the list one by one.
Since a std::list stores elements in separate nodes connected by pointers, the CPU cannot jump directly to an element like it can in a std::vector.
Instead, traversal follows the links between nodes.
Consider the following list:
Head
 ↓
+----+    +----+    +----+    +----+
| 10 | -> | 20 | -> | 30 | -> | 40 |
+----+    +----+    +----+    +----+
                               ↑
                              Tail
To reach 40, the iterator must visit:
10 → 20 → 30 → 40This is why traversal complexity is:
O(n)where n is the number of nodes.
Internal Memory Operations
Step 1
The iterator points to the first node.
Iterator
   ↓
+----+
| 10 |
+----+
Step 2
Read the current node’s value.
*itreturns:
10Step 3
Move to the next node.
++it;The iterator follows the node’s next pointer.
10 → 20Step 4
Read the new node’s value.
*itreturns:
20Step 5
Repeat until reaching end().
while(it != numbers.end())The special iterator end() represents a position after the last node.
Forward Traversal Example
#include <iostream>
#include <list>

using namespace std;

int main()
{
    list<int> numbers = {10, 20, 30, 40, 50};

    cout << "Forward Traversal: ";

    for(auto it = numbers.begin();
        it != numbers.end();
        ++it)
    {
        cout << *it << " ";
    }

    cout << endl;

    return 0;
}
Input
No Input RequiredOutput
Forward Traversal: 10 20 30 40 50Range-Based For Loop Traversal
This is the simplest and most commonly used method.
#include <iostream>
#include <list>

using namespace std;

int main()
{
    list<int> numbers = {10, 20, 30, 40, 50};

    cout << "Traversal: ";

    for(int value : numbers)
    {
        cout << value << " ";
    }

    cout << endl;

    return 0;
}
Output
Traversal: 10 20 30 40 50Reverse Traversal
Because std::list is doubly linked, every node contains a pointer to the previous node.
This allows movement backward.
10 ← 20 ← 30 ← 40 ← 50using reverse iterators.
#include <iostream>
#include <list>

using namespace std;

int main()
{
    list<int> numbers = {10, 20, 30, 40, 50};

    cout << "Reverse Traversal: ";

    for(auto it = numbers.rbegin();
        it != numbers.rend();
        ++it)
    {
        cout << *it << " ";
    }

    cout << endl;

    return 0;
}
Output
Reverse Traversal: 50 40 30 20 10When Traversal Becomes Expensive
Suppose a list contains:
1,000,000 elementsTo reach the last element:
auto it = numbers.begin();

advance(it, 999999);
the iterator must perform:
999,999 pointer jumpsThis is why random access is not supported.
The following code is illegal:
numbers[5];and
numbers.at(5);because a linked list has no concept of direct indexing.
Key Takeaways
- Traversal means visiting nodes sequentially.
- Iterators move using node pointers.
- Forward traversal uses
begin()andend(). - Reverse traversal uses
rbegin()andrend(). - Random access is impossible.
- Every traversal operation requires O(n) time.
6. Finding Elements
Common Method
std::find()Memory Operations
Step 1: Begin at begin().
Step 2: Compare the current value.
Step 3: Move to the next node.
Step 4: Continue until found or end() is reached.
Example
#include <iostream>
#include <list>
#include <algorithm>
using namespace std;

int main()
{
    list<int> numbers = {10, 20, 30, 40, 50};

    int target;

    cout << "Enter number to search: ";
    cin >> target;

    auto it = find(
        numbers.begin(),
        numbers.end(),
        target
    );

    if(it != numbers.end())
    {
        cout << target
             << " found in the list."
             << endl;
    }
    else
    {
        cout << target
             << " not found in the list."
             << endl;
    }

    return 0;
}
Complexity:
O(n)7. Deleting Elements
Nodes can be removed without shifting other elements.
Available Functions
pop_front()
pop_back()
erase()
std::erase()   // C++20
Memory Operations
Step 1: Locate the target node.
Step 2: Disconnect it from neighboring nodes.
Step 3: Connect surrounding nodes together.
Step 4: Destroy the stored object.
Step 5: Deallocate the node memory.
Example
numbers.pop_front();
numbers.pop_back();

auto it = numbers.begin();
std::advance(it, 1);

numbers.erase(it);
C++20 Uniform Erasure
std::list<int> numbers = {10,20,10,30};

std::erase(numbers, 10);
Result:
20 308. Other Member Functions
std::list contains specialized operations optimized for linked lists.
sort()
Sorts the list using merge sort.
Memory Operations
Step 1: Split the list into smaller segments.
Step 2: Sort segments recursively.
Step 3: Reconnect nodes in sorted order.
numbers.sort();Complexity:
O(n log n)merge()
Combines two sorted lists.
Memory Operations
Step 1: Compare nodes from both lists.
Step 2: Relink nodes into one sequence.
Step 3: Transfer ownership without copying values.
numbers.merge(otherNumbers);reverse()
Reverses the list.
Memory Operations
Step 1: Visit every node.
Step 2: Swap next and prev.
Step 3: Update head and tail references.
numbers.reverse();clear()
Removes all nodes.
Memory Operations
Step 1: Traverse every node.
Step 2: Destroy stored objects.
Step 3: Deallocate node memory.
Step 4: Reset the list to an empty state.
numbers.clear();Utility Functions
numbers.size();
numbers.empty();
Time Complexity Analysis
| Operation | Complexity |
|---|---|
| Push Front | O(1) |
| Push Back | O(1) |
| Insert at Known Position | O(1) |
| Erase at Known Position | O(1) |
| Access by Index | O(n) |
| Search | O(n) |
| Traversal | O(n) |
| Sort | O(n log n) |
Iterator Validity & Memory Guarantees
One major advantage of std::list is iterator stability.
Stable Iterators
When inserting or deleting elements:
- Existing iterators remain valid
- Existing references remain valid
- Existing pointers remain valid
except for iterators referencing removed elements.
No Reallocation
Unlike std::vector, a list never relocates all elements into a larger memory block.
Best Practices
Prefer Emplace Operations
Instead of:
numbers.push_back(obj);Use:
numbers.emplace_back(args);This constructs objects directly inside the node.
Use List-Specific Algorithms
Prefer:
numbers.sort();
numbers.unique();
numbers.remove(value);
over generic STL algorithms.
These functions manipulate node pointers directly.
Use Modern Erasure APIs
Prefer:
std::erase(numbers, value);
std::erase_if(numbers, predicate);
instead of the traditional erase-remove idiom.
Common Pitfalls
Poor Cache Locality
Nodes are scattered throughout memory.
vector  -> cache friendly
list    -> cache unfriendly
Heavy iteration workloads often run faster with std::vector.
No Efficient Binary Search
Functions such as:
std::lower_bound()still require linear iterator movement.
Assuming O(1) Means Faster
Although insertion and deletion are O(1):
- Finding the location is often O(n)
- Pointer chasing adds overhead
- Cache misses reduce performance
In many practical benchmarks, std::vector outperforms std::list.
Conclusion
std::list excels when applications require:
- Frequent insertions and deletions
- Stable memory addresses
- Iterator validity
- Efficient node manipulation
However, its non-contiguous memory layout introduces cache inefficiencies and eliminates random access.
For most workloads, std::vector remains the preferred container. When constant-time structural modifications and stable references are essential, std::list becomes the right tool for the job.
Understanding the internal behavior of std::list enables developers to choose the most appropriate container and write more efficient modern C++ applications.